


$7.99 when purchased online
Target Online store #3991
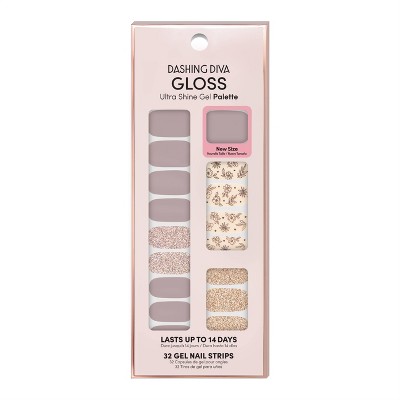
About this item
Highlights
- Key Features:
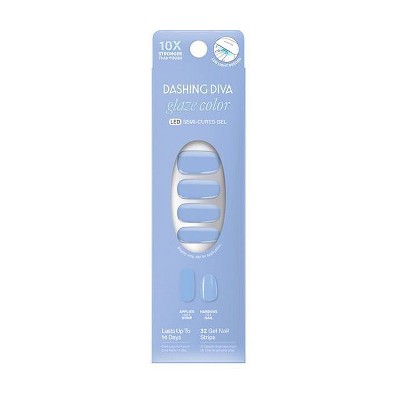
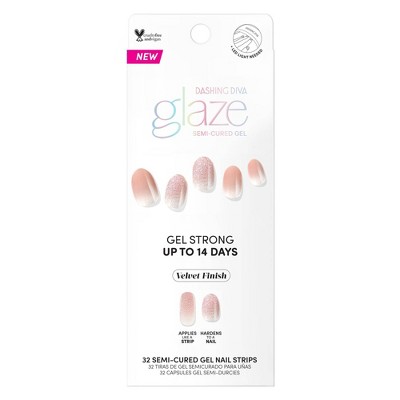
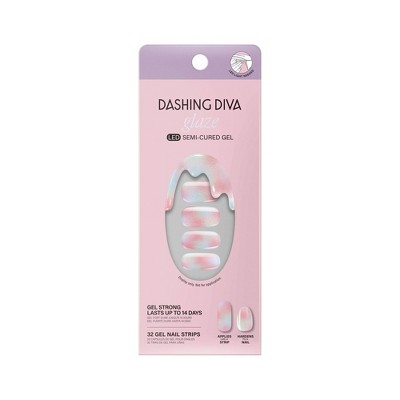
- High-shine gel manicure that lasts up to 14 days
- Chip-resistant, ultra-glossy gel nail strips
- Quick application, non-wrinkling and waterproof formula
- No UV dry time
- Gentle, non-damaging removal
- Vegan, cruelty-free, and 10-free
Description
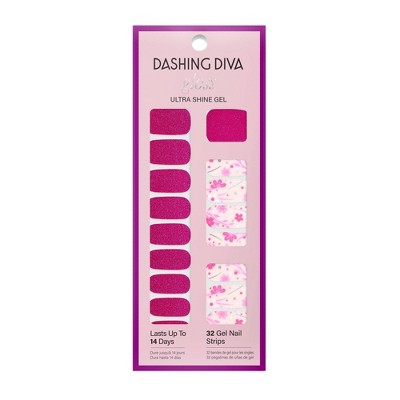
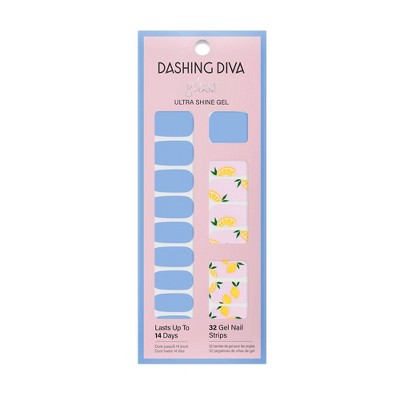
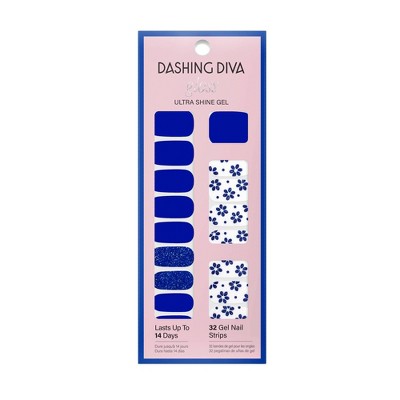
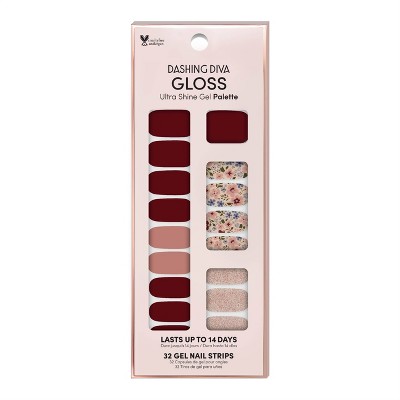
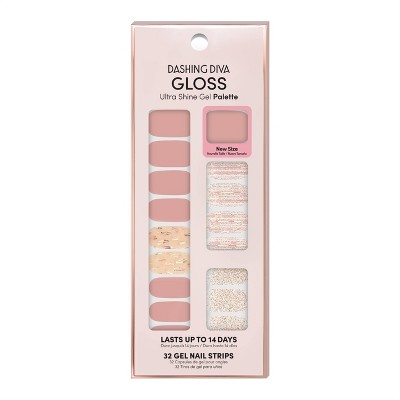
White & ivory gel nail strips featuring a collection of multicolor wallflower accents with a glossy, high-shine finish. Our most romantic floral set yet! Create custom nail look in minutes with the nail polish alternative -- Dashing Diva GLOSS Ultra Shine Gel Palette. These easy-to-apply gel nail strips deliver a super-strong, chip-resistant, high-shine gel mani that lasts for up to 14 days.
Each GLOSS Ultra Shine Gel Palette includes everything you need to take your mani game to the next level! Mix and match solid colors with eye-catching accent designs for a unique nail look that’s sure to make even your manicurist jealous.
Includes: 32 gel manicure strips (20 base color, 12 accents), Prep pad, Nail file, Instruction sheet
How To Use:
STEP 1: PREP
• Wash hands with soap and water.
• Shape nails and push back cuticles.
• Use enclosed Prep Pad to ensure nails are clear from oils and residue.
• Make sure your nails are completely dry before application.
Pro Tip: Try Red Therapy Base Seal Treatment for GLOSS to hydrate and strengthen natural nails while extending the wear of GLOSS.
STEP 2: SELECT SIZE
• Select strip size for each nail. For optimal fit, the strip should not exceed past the nail bed onto skin or cuticles.
STEP 3: APPLY
• Gently lift strip from sheet starting from edge.
• Place strip over the center of your nail, starting at cuticle line and pressing outward.
STEP 4: PRESS
• Press down firmly from center and side to side.
STEP 5: FILE
• Fold over excess material.
• Position the nail file horizontally along the contour of your nail. With one sweeping motion, file firmly across your free edge. Be sure to file in one direction at a time, filing from side to side will tear the edges.
How to Remove:
STEP 1: REMOVE
• Apply a drop of cuticle oil or acetone remover onto your nail.
STEP 2: LIFT
• Use manicure stick to gently and slowly lift nail strip from corner of the cuticle area.
• Gradually roll the strip off your nail.
CAUTION: Do not peel off with force or in one quick motion
• Strips do not dry out, store your extras for more mani creations
Number of Pieces: 32
Color Finish: Gloss
Color Palette: Bright Tones
TCIN: 87299609
UPC: 096100121332
Item Number (DPCI): 052-06-1853
Origin: Imported
If the item details above aren’t accurate or complete, we want to know about it.
Shipping details
Estimated ship dimensions: 2 inches length x 5 inches width x 8 inches height
Estimated ship weight: 0.06 pounds
Return details
This item can be returned to any Target store or Target.com.
This item must be returned within 90 days of the date it was purchased in store, shipped, delivered by a Shipt shopper, or made ready for pickup.
See the return policy for complete information.
Frequently bought together
Guests also viewed
$7.99
Buy 1, get 1 25% off select beauty & nail care products
4.2 out of 5 stars with 18 ratings
$7.99
Buy 1, get 1 25% off select beauty & nail care products
1 out of 5 stars with 1 ratings
$7.99
Buy 1, get 1 25% off select beauty & nail care products
4.4 out of 5 stars with 11 ratings
$10.99
Buy 1, get 1 25% off select beauty & nail care products
3.7 out of 5 stars with 13 ratings
$7.99
Buy 1, get 1 25% off select beauty & nail care products
4.2 out of 5 stars with 233 ratings
$7.99
Buy 1, get 1 25% off select beauty & nail care products
4.1 out of 5 stars with 725 ratings
Discover more options
$7.99
Buy 1, get 1 25% off select beauty & nail care products
4.1 out of 5 stars with 725 ratings
$7.99
Buy 1, get 1 25% off select beauty & nail care products
4.1 out of 5 stars with 711 ratings
$7.99
Buy 1, get 1 25% off select beauty & nail care products
4.2 out of 5 stars with 233 ratings

$7.99
Buy 1, get 1 25% off select beauty & nail care products
4 out of 5 stars with 123 ratings
$12.99
Buy 1, get 1 25% off select beauty & nail care products
4 out of 5 stars with 94 ratings
$12.99
Buy 1, get 1 25% off select beauty & nail care products
4.6 out of 5 stars with 17 ratings
Related Categories
Guests are saying
Guests love the Dashing Diva nail strips for their beautiful designs, ease of application, and long-lasting wear. The floral and glitter accents are particularly popular, and many guests receive compliments on their nails. Some guests suggest using a clear top coat for added durability. A few guests experienced issues with the stickers not adhering well.
Summary created by AI from text of reviews reflecting recent feedback provided across different star ratings (includes incentivized reviews)
4.9 out of 5 stars with 157 reviews
easy to apply: 4.65 out of 5
easy to remove: 4.68 out of 5
long lasting: 4.32 out of 5
quality: 4.67 out of 5
value: 4.55 out of 5
92% would recommend
25 recommendations
Beautiful and summery!
5 out of 5 stars
N.Patel - 30 days ago
originally posted on dashingdiva.com

I got so many compliments with these! Great colors that go with everything!
My favorite!!
5 out of 5 stars
Ashley S. - 2 months ago
originally posted on dashingdiva.com
I love this design - it goes on easily and smooth, it's colorful without being too loud. I get tons of compliments whenever I wear these. I will absolutely be a repeat buyer
5 stars all around
5 out of 5 stars
Julie - 2 months ago
originally posted on dashingdiva.com
This is the most natural one out there!! I get so many compliments when I wear this set and it’s so pretty!
One of my favorite sets
5 out of 5 stars
Megan - 5 months ago
originally posted on dashingdiva.com
These are so pretty and once again lasted forever!
Flowers at your fingertips
5 out of 5 stars
Sam - 7 months ago
originally posted on dashingdiva.com
As a flower lover, I love this set! The only thing that would make it better is if the entire set was the floral design! So pretty!
Gorgeous and long lasting
5 out of 5 stars
Danielle G. - 7 months ago
originally posted on dashingdiva.com
The only product I can use that stays on without chipping and even has strengthened my nails is Dashing Diva.
New favorite!
5 out of 5 stars
Shannon - 8 months ago
originally posted on dashingdiva.com
Love Dashing Diva! This is my new favorite! Adorable!
My All-Time Favorite
5 out of 5 stars
Lauren - 8 months ago
originally posted on dashingdiva.com
I love this floral design, it better stick around forever!
flower
5 out of 5 stars
Dawn R. - 8 months ago
originally posted on dashingdiva.com
Love this pack of nail polish. Variety of colors on flowers that go with any spring or summer outfits.
Have purchased 3x
5 out of 5 stars
Kari - 9 months ago
originally posted on dashingdiva.com
Love this set! Always looks so good.
obsessed
5 out of 5 stars
lisa - 9 months ago
originally posted on dashingdiva.com
one of my favorites ..very pretty easy to apply long lasting.!!
Love these
5 out of 5 stars
Stephanie M. - 10 months ago
originally posted on dashingdiva.com
This is a really cute set. Perfect for Spring through fall. It was a good transition look from summer to fall.
If your thinking about it buy it!
5 out of 5 stars
Mara - 10 months ago
originally posted on dashingdiva.com
I finally after over 20 years have stopped putting acrylic or gel polish on my nails. These have saved me during the transition period, allowing for trendy styles that I'm used to on my natural nails. I have almost grown out all the damage and it's thanks to these! This is my favorite set. They are so pretty and I get compliments every day! They are going on two weeks with just one nail having chipped!
Winner! Winner!
5 out of 5 stars
Sheba P. - 11 months ago
originally posted on dashingdiva.com
Wallflower Frenzy looks hand painted! I was at a speed networking event this weekend...I have never received so many compliments on my nails (I could have sold 10 packets easily!!!!). I have been using Dashing Diva Gloss Nail Wraps for 3 years and these by far went on the easiest and lasted the longest (photo below is day 10) - the last set lasted a full 24 days! The seem thinner, the clear nails beds are very forgiving and didn't buckle around the cuticle like some of the other designs that I have tried. DD...please make more wraps like these
Perfect combination
5 out of 5 stars
Anna M. - 11 months ago
originally posted on dashingdiva.com
They are my favorite!!! I get compliments all the time!
Amazing product
5 out of 5 stars
Faith Z. - 11 months ago
originally posted on dashingdiva.com
I have ordered several different designs and colors and I’m so impressed by the quality and rich colors!
Summer Favorite!
5 out of 5 stars
Ashleigh O. - 1 year ago
originally posted on dashingdiva.com
I absolutely LOVE this print for summer, SUPER versatile and so easy to put on. First pic is day 1. Second pic is day 7. I’m a nurse and mom of 3, I am active and always typing, cleaning, cooking, these stickers LAST up to 3 weeks and you still have to remove it. Super fan and can’t stop raving about these to everyone!
First try- I’m so impressed
5 out of 5 stars
Julie - 1 year ago
originally posted on dashingdiva.com
These were so easy to put on my nails and looked great. I have tiny nail beds, short nails and traditional polish chips in two days. This product lasted over 10 days. It did not chip or peel it was just time for a change.
Love
5 out of 5 stars
Deanna - 1 year ago
originally posted on dashingdiva.com
So beautiful love these so much
Super cute!
5 out of 5 stars
Kelley M. - 1 year ago
originally posted on dashingdiva.com
I love this design! Super easy to apply and lasts about 2 weeks. I like that this design allows for some room for user error so you can’t see the application flaws, i.e, not perfectly straight or choosing a size that is a bit off. One pack has enough sizes to use for two full manicures.