


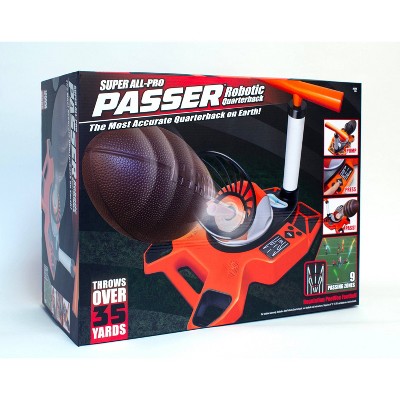
All Pro Passer Pickle Ball
$41.99 reg $59.99
Sale save $18.00 (30% off)
In Stock
Eligible for registries and wish lists
About this item
Additional product information and recommendations
Discover more options
- $299.99reg $499.99 Sale
- $248.99reg $299.99 Sale
- $50.99reg $86.99 Sale
- $67.99reg $169.99 Sale
- $83.99reg $169.99 Sale


Frequently bought together
- $9.99was $14.99 New lower price4.7 out of 5 stars with 310 ratings


Guests also viewed
Related Categories
Guests are saying
This pickleball trainer machine offers a fun way to practice and improve skills, especially for families and beginners. Many guests appreciate its ability to enhance accuracy and provide enjoyable practice sessions. However, some have experienced issues with ball jamming and inconsistent performance. Despite these concerns, the product is seen as a valuable tool for honing pickleball skills, making it a great addition for those looking to play more often.
Summary created by AI from text of reviews reflecting recent feedback provided across different star ratings (includes incentivized reviews)
3.6 out of 5 stars with 30 reviews
quality: 2.56 out of 5
value: 3.22 out of 5
65% would recommend
20 recommendations
1 out of 5 stars
Thumbs down graphic, would not recommend
31 May, 2026
Dont buy
Dislike!!! It’s junk. Balls don’t fit. You have to leave it unscrewed to get the balls to go through the hole. Also the net is extremely hard to fit. We had to use electrical tape to get it into place. Taking back to Target
1 reply from NSI Product Support Team team - 23 days ago
We’re so sorry you had such a frustrating experience with your All-Pro Passer Pickle Ball, Colleen. We’re especially sorry to hear you had trouble with both the ball feed and the net assembly. Please reach out to our customer service team at custserv@nsi-int.com and tell them exactly what’s happening and what you’ve tried, so they can troubleshoot the issue and help get you up and running. Please put “Target Review Follow Up” in the subject line, and let them know you published this review under the name Colleen.
1 out of 5 stars
Thumbs down graphic, would not recommend
11 April, 2026Verified purchase
Not working
Not working
1 reply from NSI Product Support Team team - 2 months ago
We’re sorry you had a disappointing experience with your All-Pro Passer Pickle Ball, Shilpa, but we really want to make things right. Please reach out to our customer service team at custserv@nsi-int.com and tell them exactly what’s happening and what you’ve tried, so they can troubleshoot the issue and get you up and running again. Please put “Target Review Follow Up” in the subject line, and let them know you published this review under the name Shilpa.
4 out of 5 stars
Thumbs up graphic, would recommend
10 April, 2026Verified purchase
I like it!
For $60 I really like this machine! Obviously, it's not going to work like the $1000+ machines, but it shoots out the ball and gives me a good practice session. The ball DOES stick occasionally, but normally I just pop in another ball and they both shoot out. I think it works fine for the price point and enjoy using it! My grandkids also LOVE playing with it.
1 reply from NSI Product Support Team team - 2 months ago
Thank you for sharing your experience, Deanna. We’re so glad to hear you’re enjoying the All-Pro Passer Pickle Ball and finding it to be a good value for the price. It’s great to know it’s giving you a solid practice session and that your grandkids are loving it too. We also appreciate your balanced feedback about the ball occasionally sticking. Thanks again for taking the time to leave a review.
2 out of 5 stars
Thumbs down graphic, would not recommend
4 January, 2026Verified purchase
(no review title)
The quality isn’t the best for $60, and the speed is too slow. I wouldn’t recommend it. Returning
1 reply from NSI Product Support Team team - 6 months ago
We’re sorry to hear the All-Pro Passer Pickleball Trainer didn’t meet your expectations, Bella. We appreciate you sharing your feedback regarding the speed and quality. If you have any questions or would like help troubleshooting, our customer service team is happy to help at custserv@nsi-int.com . Please put “Target Review Follow Up” in the subject line and include the name you used for this review.
5 out of 5 stars
Thumbs up graphic, would recommend
29 December, 2025Verified purchase
(no review title)
Awesome
1 out of 5 stars
Thumbs down graphic, would not recommend
17 July, 2025Verified purchase
Passer Pickle Ball DOESN'T WORK
Doesn’t work ! It gets stuck and you have to have someone in there to constantly move the balls ..
1 reply from NSI Product Support Team team - 11 months ago
We're sorry you had a disappointing experience with your All-Pro Passer Pickle Ball, but we really want to make things right. Please reach out to our customer service team at custserv@nsi-int.com. Tell them exactly what’s happening and what you’ve tried, so they can troubleshoot the issue and get you up and running again. Please put "Target Review Follow Up" in the subject line, and let them know you published this review under Best Epilator Ever.
1 out of 5 stars
Thumbs down graphic, would not recommend
13 July, 2025
Useful device
The ball bounces of the net and into the floor. It doesn't fall to the bottom for it to spit back out. I don't know if the one I bought was defective but it didn't work at all. It also spits out three balls at a time instead of one by one even though it was on the slow setting.
1 reply from NSI Product Support Team team - 11 months ago
We're sorry you’re having issues with your All-Pro Passer Pickleball, but we really want to make things right. Please reach out to our customer service team at custserv@nsi-int.com, and they will be happy to help you. Put "Target Review Follow Up" in the subject line and tell them exactly what is happening and what you’ve tried. They can troubleshoot the issue and get you up and running, so you can enjoy your toy — or make sure you get a replacement unit, if necessary. Please let them know you published this review under "Disappointed."
5 out of 5 stars
Thumbs up graphic, would recommend
7 July, 2025
Love my trainer!
This is great to use to improve your love of pickleball without having to drag someone else to the court! Really helps to improve accuracy since you have to hit the ball into the net in order for it to be returned to you, which then makes it easy to practice even in your driveway.
1 reply from NSI Product Support Team team - 11 months ago
We are so happy to hear you love your All Pro Passer Pickle Ball.
3 out of 5 stars
Thumbs up graphic, would recommend
3 July, 2025Verified purchase
Addicting
Great when it’s feeding balls correctly and the back net doesn’t fall off. I love this machine when it works properly. The ball sometimes get stuck (jammed) from shooting out. Also, the back net is very heavy for the plastic brackets and the brackets keep coming undone and making the net fall off. I’m afraid the plastic clamps are going to break if not very careful.. Balls that come with this are harder and not truer pickleball size. Wish it worked with APP approved balls. This would be a game changer!!
1 reply from NSI Product Support Team team - 1 year ago
We're glad you're enjoying your pickleball trainer. Please know that if you're having any issues with your unit, you can reach out to customer service at custserv@nsi-int.com, and they will be happy to help you. Please put "Target Review Follow Up" in the subject line, and let them know you published this review under Lynda.
5 out of 5 stars
Thumbs up graphic, would recommend
12 June, 2025
Grest item
Great item for the kids
5 out of 5 stars
Thumbs up graphic, would recommend
22 May, 2025
Game changer
I'm recently retired and have found myself playing pickleball quite often. This product has allowed me to easily practice whenever I get the itch.
1 reply from NSI Product Support Team team - 1 year ago
Thank you so much! We are happy to hear how much you enjoy the All Pro Passer Pickle Ball!
5 out of 5 stars
Thumbs up graphic, would recommend
30 April, 2025
Pickle ball
Great product my kids and I enjoy very much..
5 out of 5 stars
Thumbs up graphic, would recommend
29 April, 2025
Recommend
Very sturdy and durable. Easy to set up and fun to use. I recommend purchasing this!
5 out of 5 stars
Thumbs up graphic, would recommend
27 April, 2025
Pickle fun
Great trainer. Helped improve my game.
4 out of 5 stars
Thumbs up graphic, would recommend
27 April, 2025
Great product
I recently purchased this item to improve my pickle ball game and so far i am very pleased with it.
5 out of 5 stars
Thumbs up graphic, would recommend
26 April, 2025
A great, fun trainer.
This works really well. It's a lot of fun and has really helped me get better. My kids and I make a game out of it by seeing how many returns in a row we can hit into the net.
5 out of 5 stars
Thumbs up graphic, would recommend
26 April, 2025
Despite the reviews
I was hesitant to buy this because of the reviews but figured I'd give it a shot! This product actually works very well for me and my kids.
3 out of 5 stars
18 March, 2025
Thrower distance shrank significantly
I have been impressed with this product, however after a couple of days playing around 30 minutes per day, the throwing mechanism reduced significantly. I've replaced the batteries and that has not had any impact on the actual distance it now throws.. very disappointing as I really enjoyed this product.
1 reply from NSI Product Support Team team - 1 year ago
We're sorry your All Pro Pickleball trainer is having issues. Please reach out to our customer service team at custserv@nsi-int.com and tell them exactly what is happening, so they can troubleshoot the issue. If they can't fix this, they will make sure you receive a replacement unit. Please put Target Review Follow Up in the subject line, and let them know you published this review under Frank.
1 out of 5 stars
Thumbs down graphic, would not recommend
18 March, 2025Verified purchase
Avoid
I had low expectations for this but I wanted to warn people that this doesn’t really work. The ball barely pops out even on full speed. Which I could even work with but you have to get so close to the stand to hit the ball that the ball then bounces off of the net, soooo…. I guess technically it spits out a ball to hit but you spend most of the time chasing balls.
1 reply from NSI Product Support Team team - 1 year ago
We're sorry you had a disappointing experience with your All-Pro Passer Pickle Ball trainer, but we really want to make things right. Please reach out to customer service at custserv@NSI-int.com, and tell them exactly what is happening, so they can troubleshoot the issue. They will be happy to help you. Please put "Target Review Follow Up" in the subject line, and let them know you published this review under Lego my lego.
2 out of 5 stars
Thumbs down graphic, would not recommend
14 March, 2025
Not good for beginners!
I bought this trainer machine to pratice hitting pickleballs balls and improve my beginner skills and let me tell you how furstrating it is!!! I've spent more time chasing after balls than hitting them! The issue is that this machine does not hold all the balls to throw them at you one after the other so you can properly practice hitting the balls. You actually need to keep the balls with you and hit them one ball at a time precisely into the net (with enough power but not to much) so that the ball can be thrown back at you! This level of skills and precision is definitely not beginner friendly and so I l've spent the time throwing balls for them to only hit the net a few times and sometimes to get into the net but with to much power which did not allow them to fall into the machine's throwing hole. I wish I could get my money back! Does Target even offer refunds for used products?
1 reply from NSI Product Support Team team - 1 year ago
We're sorry you’re having issues with your All-Pro Passer Pickle Ball set, but we really want to make things right. Please reach out to our customer service team at custserv@nsi-int.com, and they will be happy to help you. Put "Target Review Follow Up" in the subject line, and let them know you published this review under Titia F.